Principles of statistics in Statistical Parametric Mapping
This notebook is a basic introduction to the statistics of statistical parametric mapping (SPM). The page is designed for readers who have had very little formal statistical background, and I have tried to keep formulae to a minimum.
For a more technical treatment of the statistical background, see the chapter on the general linear model in the book Human Brain Function (2nd edition)
Getting the data
In order to run this tutorial, you'll need to download and unpack a set of data files.
The following two commands will download and unpack them on linux:
wget http://imaging.mrc-cbu.cam.ac.uk/downloads/Tutscans/egscans.tar.gz
tar xzf egscans.tar.gz
The fetch_scans() function below will do all the downloading
in a cross-platform manner, using python-only tools. You should run it even if you downloaded the files
manually, as it will compute the necessary paths for the rest of the script (it won't re-download files
already present).
import os
import tarfile
import urllib

def fetch_scans():
    # Names of the files in the data bundle
    scans_dir = 'egscans'
    files = [os.path.join(scans_dir, 'snn03055dy%i.img' % i) for i in range(1,13)]

    # The remote url and filename for local storage
    data_url = 'http://imaging.mrc-cbu.cam.ac.uk/downloads/Tutscans/egscans.tar.gz'
    tarball = 'egscans.tar.gz'

    # First, check that we don't already have the files, whose names are:
    if all(map(os.path.isfile, files)):
        print 'All files already present, nothing to download.'
        return files

    # If we don't have them, make the storage directory, fetch (if needed)
    # and unpack skipping the .mat files that are in the tarball.
    if not os.path.isdir(scans_dir):
        os.mkdir(scans_dir)

    if not os.path.isfile(tarball):
        print "Fetching remote tarball, this may take some time depending on your network..."
        urllib.urlretrieve(data_url, tarball)

    print "Unpacking scans, omitting .mat files"
    tf = tarfile.open(tarball, 'r:gz')
    image_files = [ f for f in tf.getmembers() if not f.name.endswith('.mat')]
    tf.extractall(scans_dir, image_files)
    print "All files unpacked into", scans_dir, ', done!'
    return files

files = fetch_scans()
All files already present, nothing to download.
Starting the analysis
Let's now make actual images out of these files
import nibabel as nib
images = map(nib.load, files)
# grand mean for data
GM = 50
Now we load the affine transformation from the first image (it's the same for all) and extract the conversion parameters from voxels to MNI space (in mm).
# transformation from voxel no to mm
M = images[0].get_affine()
# mm to voxel no
iM = np.linalg.inv(M)
# coordinates of voxel of interest in mm (MNI space)
posmm = [-20.0, -42, 34]
# coordinates in voxel space (in homogenous coordinates)
posvox = np.dot(iM, posmm + [1])
# We grab the spatial part of the output.  Since we want to use it as an
# index, we need to make it a tuple
posvox = tuple(posvox[:3].astype(int))
We need to define a small utility function commonly used in SPM, we'll call it global_mean.
def global_mean(img):
    """Compute a "sorted global mean" of an image.

    This returns the mean of the image voxels that are in the range above
    1/8 of the mean."""

    m = img.mean()/8.0
    return img[img>m].mean()
With this utility, we can now get the data for the voxel of interest across all the images, and compute the global mean of each scans:
nimgs = len(images)
vdata = np.zeros(nimgs)
gdata = np.zeros(nimgs)
for i, V in enumerate(images):
    d = V.get_data()
    vdata[i] = d[posvox]
    gdata[i] = global_mean(d)
We can display slices from the scans. Here is slice 30 of the last scan:
last_image = images[-1]
last_data = last_image.get_data()
imshow(last_data[:, :, 30])
<matplotlib.image.AxesImage at 0x3efebd0>

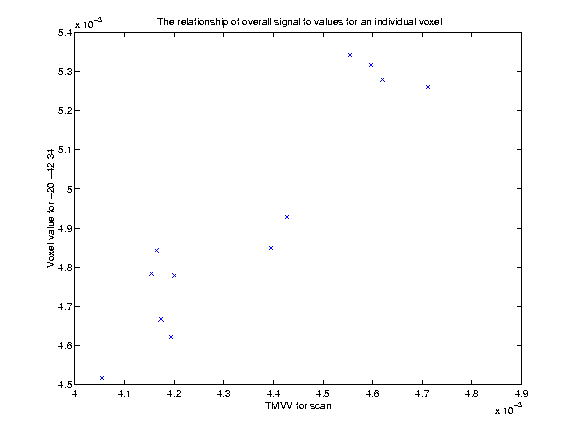
Plot globals
plt.plot(gdata, vdata, 'x')
plt.xlabel('TMVV for scan')
plt.ylabel('Voxel value for -20 -42 34')
plt.title('The relationship of overall signal to values for an individual voxel')
<matplotlib.text.Text at 0x3fceb50>

# We can check against the current data in the Cambridge wiki tutorial
from IPython.core.display import Image
Image('http://imaging.mrc-cbu.cam.ac.uk/images/st_globals.gif')
# proportionally scale data
pvdata = vdata / gdata
# scale to global mean of 50
Y = pvdata * GM
# our covariate
ourcov = np.array([5,4,4,2,3,1,6,3,1,6,5,2])
# plot data
plot(ourcov, Y, 'x')
xlabel('Task difficulty')
ylabel('PS voxel value')
xlim(0, 7)
title('The relationship of task difficulty to voxel value');

# guess intercept, slope, estimated points
guessic   = 55
guesslope = 0.5
guessPts  = guessic + guesslope*ourcov
For plotting it will be convenient to have the boundaries of our plot region available
minx = 0
maxx = ourcov.max()+1 # min max x for plots
axs = np.array([minx, maxx, Y.min()*0.98, Y.max()*1.02])
# plot data with guess intercept and slope
plot(ourcov, Y, 'x')
plot(axs[:2], guessic+guesslope*axs[:2], ':') # guessed line
# plot guessed residuals
for i, c in enumerate(ourcov):
  plot([c, c], [Y[i], guessPts[i]], color='r')
plt.axis(axs)
xlabel('Task difficulty')
ylabel('PS voxel value')
xlim(0, 7)
title('A first guess at a linear relationship, and its residuals');

# residuals from guess slope
guessRes = Y - guessPts
Now we construct the design matrix $X$.
X = np.column_stack([ourcov, ones(nimgs)])
We would like to display it in a useful way
def scale_design_mtx(X):
    """utility to scale the design matrix for display

    This scales the columns to their own range so we can see the variations
    across the column for all the columns, regardless of the scaling of the
    column.
    """
    mi, ma = X.min(axis=0), X.max(axis=0)
    col_neq = (ma - mi) > 1.e-8
    Xs = np.ones_like(X)
    mi = mi[col_neq]
    ma = ma[col_neq]
    Xs[:,col_neq] = (X[:,col_neq] - mi)/(ma - mi)
    return Xs
def show_design(X, design_title):
    """ Show the design matrix nicely """
    figure()
    plt.gray()
    imshow(scale_design_mtx(X), interpolation='nearest')
    title(design_title)
# display using our fancy function
show_design(X, 'Design matrix for the first analysis')

We need to know the degrees of freedom. In this simple case, we have two effects (the intercept and the slope) and 12 observations, leaving us with 10 degrees of freedom. In general, the number of effects we have is given by the number of independent columns in the design matrix $X$ above. This is the column rank of $X$. This is given by the numpy function numpy.linalg.matrix_rank for numpy >= 1.5, but in case you have an earlier version of numpy, a crude calculation of the matrix rank is a couple of lines of code:
def matrix_rank(X):
    U, S, V = np.linalg.svd(X)
    # Number of singular values above an arbitrary small threshold
    return np.sum(S > 1e-5)
Now we can calculate the degrees of freedom in a more general way:
df = nimgs - matrix_rank(X)
# mean SoS for guess slope
guessRSS = (guessRes**2).sum() / df
The analysis giving the least squares fit is very simple: we matrix multiply the pseudoinverse of $X$ (denoted $X^+$) by the data, to get the estimation of the model parameters, the $\hat\beta$ 's : $\hat\beta = X^+ Y$
# the analysis, giving slope and constant
B = dot(pinv(X), Y)
print B
[ 0.63928135 54.39383796]
# plot data with new least squares line
plot(ourcov, Y, 'x')
bound = np.array([minx, maxx])
plot(bound, bound*B[0]+B[1], 'r')
axis(axs)
xlabel('Task difficulty')
ylabel('PS voxel value')
title('The least squares linear relationship');

We'll need some statistical machinery from scipy
from scipy.stats import t as tdist, norm as normdist
And now we can compute our stats for this contrast: The $\textbf{Residual Sum of Square}$ (RSS) is :
$$ RSS = \sum_{i=1}^{12} (Y_i - X_i \beta)^2$$$X_i$ is the $i$th row of the matrix $X$. The $\textbf{Mean Residual Sum of Square}$ is :
$$ MRSS = RSS / \textit{df} $$where $\textit{df}$ are the degrees of freedom, computed as the number of observations (here, 12) minus the rank of the design matrix (ie, the number of independant vectors in X). The $MRSS$ is the noise variance estimation: $\widehat{\sigma^2}$.
The $\\textbf{Standard Error}$ (SE) of $c \\beta$ is computed with $\textrm{SE} = \\sqrt{\\widehat{\\sigma^2} c (X^t X)^+ c^t} $ (why is that so is to be expanded here ...) The t test is then : $t = \\frac{c \\beta}{\\textrm{SE}} $
# Contrast
C = np.array([1, 0])
# t statistic and significance test
RSS   = ((Y - dot(X, B))**2).sum()
MRSS  = RSS / df
SE    = np.sqrt(MRSS*dot(C, (dot(pinv(dot(X.T, X)), C.T))))
t     = dot(C, B)/SE
ltp   = tdist(df).cdf(t) # lower tail p
p     = 1-ltp           # upper tail p

# print results to window
print 'First TD analysis: t= %2.2f, p= %0.6f' % (t, p)
First TD analysis: t= 7.95, p= 0.000006
We can package the analysis up into a function:
def t_stat(Y, X, C):
    """ betas, t statistic and significance test given data, design matrix, contrast
    """
    # Calculate the parameters
    B = dot(pinv(X), Y)
    RSS   = ((Y - dot(X, B))**2).sum()
    # Recalculate df
    df =  X.shape[0] - matrix_rank(X)
    MRSS  = RSS / df
    SE    = np.sqrt(MRSS*dot(C, (dot(pinv(dot(X.T, X)), C.T))))
    t     = dot(C, B)/SE
    ltp   = tdist(df).cdf(t) # lower tail p
    p = 1 - ltp # upper tail p
    return B, t, p

# Results are the same
print 'First TD analysis again: B = %s, t= %2.2f, p= %0.6f' % t_stat(Y, X, C)
First TD analysis again: B = [ 0.63928135 54.39383796], t= 7.95, p= 0.000006
# save data for analysis in e.g. SPSS
np.savetxt("voxdata.txt", Y)
now analysis for added covariate note that this and all the other analyses here use exactly the same code as above
# design matrix, df
X = np.column_stack([ourcov, np.arange(1, nimgs+1), np.ones(nimgs)])
show_design(X, 'Design matrix for added covariate')

# Contrast
C = np.array([1, 0, 0])
# the analysis
B, t, p = t_stat(Y, X, C)
print 'Added covariate analysis: t= %2.2f, p= %0.6f' % (t, p)
Added covariate analysis: t= 7.81, p= 0.000013
Conditions analysis